Banana Pi
Summary
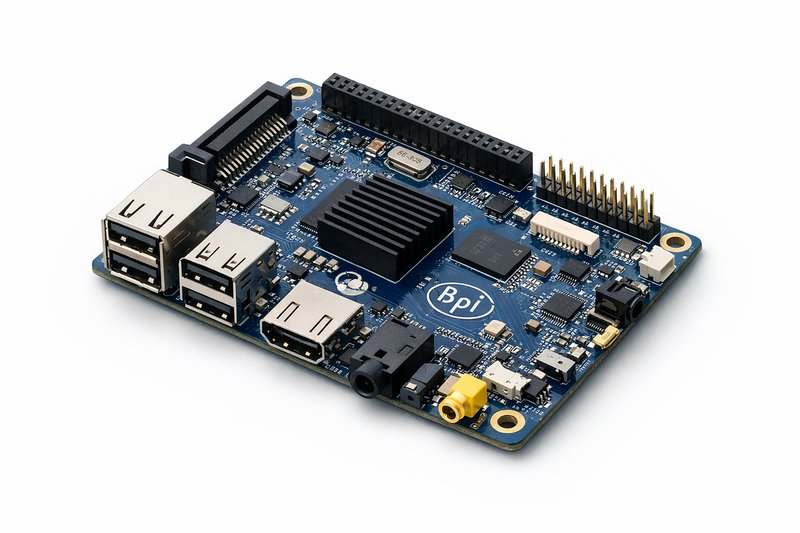
Banana Pi is an ARM-based single-board computer built around the Allwinner A20 dual-core processor. It is aimed at Linux development, network services, and embedded projects rather than general desktop use. The board includes onboard SATA, Gigabit Ethernet, a 40-pin GPIO header, and broad operating system support, which makes it a practical fit for home servers, network storage, development environments, and educational work without much fuss.
This page covers what Banana Pi does well, where it runs out of headroom, and how to get it booted cleanly the first time.
Banana Pi in practice
Banana Pi is a credit-card-sized computer that runs full Linux distributions including Raspbian, Ubuntu, Debian, Arch Linux, and Android. Power draw is low - typically 3 to 5 watts at load - it runs silently with passive cooling, and the GPIO header plus peripheral interfaces give it considerably more flexibility than a simple media box.
The processor is a dual-core ARM Cortex-A7 running at 1GHz. That is enough headroom for most server and development tasks without feeling immediately cramped, though 1GB of DDR3 RAM means you will notice the ceiling if you stack too many services. The SATA port is the feature that sets it apart from many comparable boards: attach a 2.5" or 3.5" hard drive and you have a NAS without any USB bottleneck. Gigabit Ethernet makes the same point - the original Raspberry Pi used a USB-bridged 10/100 interface, which capped real-world throughput well below what the spec implied. Banana Pi does not have that problem. HDMI output supports 1080p, USB ports cover peripherals and storage, and the microSD slot handles boot and recovery in the usual way.
What people actually run on it
Home network services
The SATA port and Gigabit Ethernet make Banana Pi a sensible fit for Samba, NFS, or FTP file sharing. Running dnsmasq or Pi-hole for local DNS and ad blocking across the whole network is a popular first project, and the power consumption makes it reasonable to leave on permanently. OpenVPN or WireGuard both work for a VPN gateway. More modest monitoring jobs - Nagios, Prometheus, or lightweight custom scripts - run fine provided you are not expecting enterprise-scale collection. CUPS can share USB or network printers if you still have hardware worth sharing.
Development and learning
Compiling and testing ARM binaries on native hardware is one of the more practical uses. It also works as a cross-compilation host if you need a cheap, always-on machine for building ARM targets. For anyone learning Linux administration, networking, or hardware interfacing, a physical board is a better teacher than a virtual machine - you get real consequences for misconfigured iptables rules. As an IoT gateway, it can aggregate sensor data, run an MQTT broker, and bridge smart home devices without the overhead of a full server.
Media and entertainment
Plex, Jellyfin, or a simple HTTP server can handle video streaming at modest bitrates. RetroPie and EmulationStation cover retro gaming on a range of classic systems. Digital signage - dashboards, information screens, or web content over HDMI - is another low-overhead application that suits the board's passive cooling and low power draw.
What you need before setup
Required hardware
You need the Banana Pi board itself - the original model with SATA connector. If you are buying new hardware, the Banana Pi BPI-M5 on Amazon is the current-generation successor: 4GB RAM, USB-C power, and SATA, the same interface set but with a faster SoC and better OS image availability.
Power supply matters more than people expect. Use 5V 2A as a minimum; flaky voltage causes odd crashes that are hard to diagnose. For the microSD card, Class 10 or UHS-I, 8GB minimum and 16GB or more preferred - stick to SanDisk, Samsung, or Kingston and avoid cheap unbranded cards. You will also need an Ethernet cable for first setup and stable networking, and a MicroUSB cable for power.
Recommended hardware
A USB-to-serial adapter - 3.3V TTL-level, ideally with an FTDI or CP2102 chipset - is invaluable for debugging boot problems before the network is up. If SATA storage is part of your plan, note that a 2.5" drive does not need extra power, but a 3.5" drive does. A case with ventilation is worth the small outlay; a heatsink is optional, but fit one if the CPU will sit under sustained load. An HDMI cable and display are useful for the first configuration pass, even if you switch to headless SSH afterwards.
Host computer requirements
For flashing the OS image, Etcher works cross-platform; dd covers Linux and macOS; Win32DiskImager is the usual Windows choice. You need an SSH client - OpenSSH on Linux and macOS, PuTTY or the built-in Windows 10+ client on Windows - and an SD card reader, whether built-in or USB.
Quick start procedure
Step 1: Download and verify OS image
- Visit the downloads hub
- Select the distribution you want - Raspbian is the usual starting point for beginners
- Check that the SHA256 checksum matches the published value
- Decompress the image if it is compressed (.xz, .gz, .zip)
Step 2: Flash image to microSD card
- Insert the microSD card into the host computer
- Launch Etcher or another flashing tool
- Select the downloaded image file
- Select the target microSD card device and double-check it before writing - flashing the wrong device is a bad day
- Flash the image and verify it
- Safely eject the card
Step 3: First boot with minimal configuration
- Insert the flashed microSD card into the Banana Pi slot
- Connect the Ethernet cable between Banana Pi and the router or switch
- Connect power last
- Watch the LEDs: red power LED solid, green activity LED blinking during boot
- Wait 60 to 90 seconds for the first boot to complete
Step 4: Establish SSH connection
- Find the Banana Pi IP address by checking the router DHCP leases or using a network scanner
- Connect via SSH:
ssh pi@192.168.1.XXX(default password varies by distribution) - Change the default password immediately:
passwd - Confirm the system booted successfully
Step 5: Initial system update
- Update package lists:
sudo apt update - Upgrade installed packages:
sudo apt upgrade -y - Reboot to load the new kernel if it changed:
sudo reboot - Reconnect via SSH after reboot, usually within 30 to 60 seconds
Post-boot verification checklist
Run these commands to confirm the board is up and the network is behaving as expected:
# Confirm system identity and kernel
uname -a
cat /etc/os-release

# Check network configuration
ip addr show
ip route show
ping -c 4 8.8.8.8

# Verify storage
df -h
lsblk

# Check system health
systemctl --failed
free -h
uptime

# Monitor system temperature
cat /sys/class/thermal/thermal_zone0/temp
# Temperature in millidegrees Celsius (50000 = 50'C)

# Verify SSH service
systemctl status sshd
First boot troubleshooting
No LEDs illuminate
Start with the power supply. Measure voltage with a multimeter - it should be 5.0V ±0.25V. A damaged cable can cause enough voltage drop to prevent boot, so swap in a known-good one. Some USB ports simply cannot supply sufficient current; try a dedicated wall adapter rather than a computer USB port.
Red LED only, no green activity
This almost always points to a bad microSD card or a corrupt image. Reflash the card, and if that does not help, try a different card - cheap or counterfeit cards fail silently more often than you would expect. Also confirm the image is actually built for Banana Pi, not for a different board. Testing the card in another device at least rules out a dead card.
Cannot find IP address
Swap in a known-good Ethernet cable first. Check the switch or router port for link activity. Confirm the DHCP server is running and handing out addresses. If none of that resolves it, connect a USB-to-TTL adapter to the serial console to read the boot messages directly - it is the fastest way to see what went wrong before the network came up.
SSH connection refused
Some distributions ship with SSH disabled by default; check the image documentation. Port 22 may also be blocked by a firewall rule. Default credentials vary by distribution, so verify you are using the right username and password. A first-boot reboot sometimes clears service startup issues that are otherwise hard to explain.
Next steps after basic setup
Security hardening
- Set up SSH key authentication: Security basics guide
- Disable password authentication for SSH once keys are working
- Configure automatic security updates
- Set up a firewall with UFW or iptables
Storage configuration
- Mount a SATA drive: Boot and storage notes
- Configure automatic mounting via /etc/fstab
- Set up RAID if using multiple drives
- Plan a backup strategy before the board holds anything you cannot lose
Service deployment
Install the services you need - Samba, OpenVPN, Pi-hole, or whatever fits the use case - and configure them to start automatically on boot. Set up monitoring and logging early rather than after a problem surfaces. Document the configuration for disaster recovery; a board running six services with no notes is harder to rebuild than it should be. For WireGuard VPN, pairing it with a Contabo VPS as a static public endpoint is a practical solution if your home IP changes.
Frequently asked questions
What's the difference between Banana Pi and Banana Pro?
Banana Pro adds WiFi, Bluetooth, and microphone input. Both boards share the same Allwinner A20 processor and most interfaces. See the Banana Pro overview for a detailed comparison.
Can Banana Pi run Raspberry Pi software?
Many Raspberry Pi applications work on Banana Pi, particularly software that uses standard Linux interfaces. Hardware-specific software that talks to Raspberry Pi GPIO directly needs modification. The WiringPi library provides GPIO compatibility for the common cases.
How much power does Banana Pi consume?
Idle power is around 2 to 3W. Light load sits at roughly 3 to 4W, and heavy load reaches 5 to 6W. SATA drives add 2 to 8W depending on the model. Without a SATA drive attached, the system typically draws under 500mA at 5V, which is 2.5W.
What operating systems work on Banana Pi?
Supported systems include Raspbian, Ubuntu and Lubuntu, Debian, Arch Linux, Android, and Gentoo. If you are deciding which Ubuntu release to flash, check the latest Ubuntu version first, then use the downloads page for the current images.
Can I boot from SATA instead of microSD?
Banana Pi boots from microSD only. After the first boot, you can move the root filesystem to the SATA drive for better performance and reliability.
How do I connect to serial console?
Use a 3.3V USB-to-TTL adapter connected to the CON3 header pins 4, 6, and 8. Set the terminal to 115200 baud, 8N1. See the contact page for detailed serial setup guidance.
What microSD card should I use?
Class 10 or UHS-I, with 8GB as the bare minimum and 16GB or more preferred. SanDisk, Samsung, and Kingston are reliable. Avoid cheap unbranded cards - they fail without warning and are hard to distinguish from counterfeits at purchase.
Why is performance slower than expected?
Check thermal throttling first by running cat /sys/devices/system/cpu/cpu0/cpufreq/scaling_cur_freq. Then look at the microSD card speed, the power supply voltage, and whether swap is thrashing with free -h. All four are common culprits.
Can I use Banana Pi for desktop computing?
Possible, but limited. The 1GB RAM cap makes modern web browsers and desktop environments awkward. It is better suited to lightweight tasks, development, and server work.
Related guides and resources
- Banana Pi technical specifications - Detailed interface breakdown
- Banana Pi resources and downloads - OS images and utilities
- Quick Start Guide - Condensed setup instructions
- Boot and storage notes - Storage troubleshooting and optimisation
- Security basics - Hardening procedures
- LeMaker Wiki - Community documentation and projects
Author: LeMaker Documentation Team
Last updated: 2026-01-10