Quick Start Guide
Summary
This guide walks through a safe, repeatable first boot for Banana Pi-class single-board computers. It focuses on avoiding common early failures (power, storage, and network) and on leaving the system in a secure baseline state.
Use it when bringing up a new board, re-flashing storage, or validating that an image is healthy before you deploy services.
Who this is for
Anyone installing a Linux image to microSD/eMMC and connecting over Ethernet or serial console.
What youll do
- Choose reliable power and storage
- Verify the downloaded image before flashing
- Flash the image and confirm the write completed
- Boot, find the boards IP address, and log in
- Update packages and lock down SSH access
Requirements
- Power supply: stable 5V supply sized for the board and attached USB devices; avoid long, thin cables that cause voltage drop.
- Storage: reputable microSD (or eMMC) media. If you see intermittent boot or filesystem errors, replace the card first.
- Networking: Ethernet recommended for first boot to reduce variables.
- Optional: 3.3V USB-to-TTL serial adapter for early-boot debugging.
Step-by-step
1. Download the OS image
Go to the downloads hub and choose the image that matches your board (Banana Pi, Banana Pro) and your intended use case (desktop, server, minimal). Download both the image file and the corresponding SHA-256 checksum file.
2. Verify image integrity
Before flashing, verify that the download completed without corruption. A corrupted image will cause unpredictable failures that are hard to debug.
Linux or macOS:
cd ~/Downloads
sha256sum -c banana-pi-image.img.xz.sha256
# Expected: banana-pi-image.img.xz: OK
Windows (PowerShell):
cd $env:USERPROFILE\Downloads
Get-FileHash -Algorithm SHA256 banana-pi-image.img.xz
# Compare the hash output with the value in the .sha256 file
If the checksum does not match, re-download the file before proceeding.
3. Flash the image to storage
Identify the correct device: Double-check before flashing. Writing to the wrong device will destroy its contents.
lsblk -o NAME,SIZE,MODEL,TYPE,MOUNTPOINT
# Look for your SD card by size and model
# Typical device paths: /dev/sdX (Linux), /dev/diskN (macOS)
Flash using dd (Linux/macOS):
# Replace /dev/sdX with the correct device (NOT a partition like /dev/sdX1)
xz -dc banana-pi-image.img.xz | sudo dd of=/dev/sdX bs=4M conv=fsync status=progress
sync
Flash using Etcher or Raspberry Pi Imager (all platforms):
These GUI tools simplify device selection and verification:
- Etcher ' Select image, select target, flash.
- Raspberry Pi Imager ' Can be used for non-Pi SBCs; handles compression automatically.
After flashing, safely eject the card and re-insert it to verify that the partitions appear correctly.
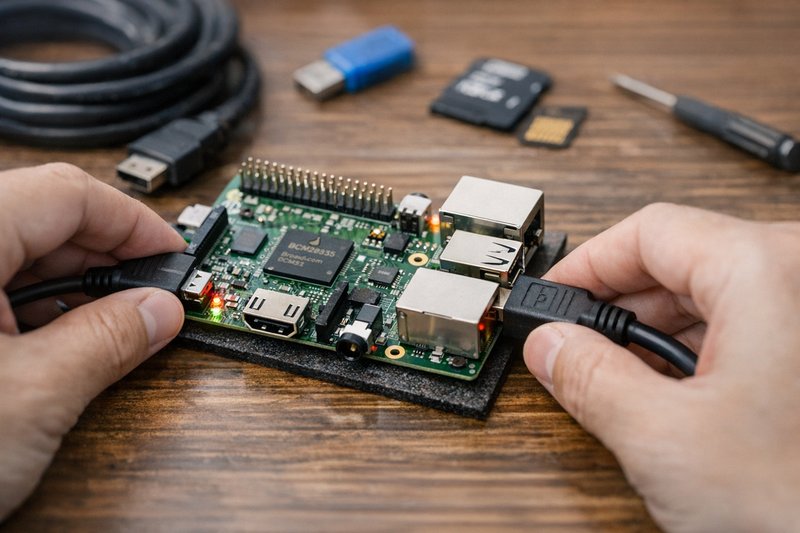
4. First boot with minimal configuration
Insert the SD card into the board and connect the following before applying power:
- Ethernet cable to your router or switch (DHCP recommended for first boot).
- HDMI cable (optional) if you want to see boot messages on a display.
- Power supply: Use a quality 5V 2A supply with a short, thick cable.
Do not attach USB peripherals yet (except keyboard if using a local console). Apply power and wait 60-90 seconds for the first boot to complete.
5. Discover the IP address and log in
Check your router's DHCP client list for a new device, typically named "bananapi", "lemaker", or showing the board's MAC address.
Alternative: scan your LAN from a Linux host:
ip neigh show
nmap -sn 192.168.1.0/24  # Adjust to your subnet
Once you have the IP address, SSH to the board:
ssh root@192.168.1.50  # Or the default user for your image
# Common defaults: root/bananapi, pi/bananapi, lemaker/lemaker
If prompted about host key authenticity, type yes to continue.
6. Update packages and apply security baseline
Once logged in, run a system update under supervision (keep console access open in case of issues):
sudo apt update
sudo apt -y full-upgrade
sudo reboot
After reboot, set up SSH key-based authentication and disable password logins:
# On your workstation:
ssh-keygen -t ed25519 -C "bananapi-access"
ssh-copy-id user@BOARD_IP

# Test key-based login before disabling passwords:
ssh user@BOARD_IP  # Should connect without password

# On the board, disable password authentication:
sudo sed -i 's/^#\?PasswordAuthentication.*/PasswordAuthentication no/' /etc/ssh/sshd_config
sudo systemctl reload ssh || sudo systemctl reload sshd
Critical: Keep your existing SSH session open when testing the new configuration. Open a second terminal to verify key-based login works before closing the original session.
Verification checks
After flashing and booting, run these commands to capture a baseline state. Save the output to compare against later if behaviour changes:
Confirm board identity and kernel version:
uname -a
cat /proc/cpuinfo | head -n 20
Confirm network configuration:
ip a       # List all interfaces and IP addresses
ip r       # Show routing table
ping -c 3 8.8.8.8  # Test external connectivity
Check for boot errors:
systemctl --failed   # List failed services
journalctl -b -p err | tail -n 50  # Recent error-level messages
dmesg | tail -n 80   # Kernel ring buffer
Verify storage is detected correctly:
lsblk      # List block devices
df -h      # Check filesystem usage and mount points
Confirm the target device before flashing (Linux):
lsblk -o NAME,SIZE,MODEL,TYPE,MOUNTPOINT
Verify a SHA-256 checksum (Linux/macOS):
cd /path/to/downloads
sha256sum -c image.sha256
Post-boot checklist
Use this checklist after first boot to ensure the system is healthy before deploying services:
- SSH access works with keys; password authentication disabled.
- System update completed without errors; reboot successful.
- Network connectivity stable (Ethernet link up, DHCP lease acquired, DNS resolving, external ping successful).
- No critical errors in
journalctl -b -p err. - Storage partitions mounted correctly; filesystems not read-only.
- Temperature within normal range (check
cat /sys/class/thermal/thermal_zone0/temp' typical idle: 40-50'C or 40000-50000 millidegrees). - Baseline boot report saved for future comparison.
Flash example (Linux with dd)
# Replace /dev/sdX with the correct device (NOT a partition like /dev/sdX1).
# This will destroy data on the target device.

xz -dc ./image.img.xz | sudo dd of=/dev/sdX bs=4M conv=fsync status=progress
sync
Find the board on the network
Start with your routers DHCP client list. On a Linux host on the same LAN, you can also check the ARP table and scan your subnet:
ip neigh show
# Example: scan a /24 (adjust to your LAN)
nmap -sn 192.168.1.0/24
Update packages
On Debian/Ubuntu-based images:
sudo apt update
sudo apt -y full-upgrade
sudo reboot
If you want a broader checklist of what to do after the system is up — locale, timezone, swap, firewall, automatic updates — the Ubuntu and Linux first-boot setup guide covers the full sequence for Ubuntu 24.04 and applies equally well to most Debian-based Banana Pi images.
Security baseline (SSH)
Use SSH keys and disable password authentication once you confirm key-based login works.
# On your workstation:
ssh-keygen -t ed25519
ssh-copy-id user@BOARD_IP

# On the board (OpenSSH server):
sudo sed -i 's/^#\?PasswordAuthentication.*/PasswordAuthentication no/' /etc/ssh/sshd_config
sudo systemctl reload ssh || sudo systemctl reload sshd
Troubleshooting
Board does not boot or shows random resets
- Symptoms: Red power LED on but no activity, or board resets during boot.
- Likely causes: Undervoltage from weak power supply or thin cable; corrupt SD card; wrong image for the board.
- Steps:
- Swap to a known-good 5V 2A power supply with a short, thick cable (USB-to-barrel or Micro-USB depending on board).
- Remove all USB peripherals and try booting with only Ethernet connected.
- Try a different SD card. Re-flash and verify the checksum before retrying.
- If available, connect a 3.3V USB-to-TTL serial adapter to see boot messages. Check for bootloader errors or kernel panics.
- Confirm you downloaded the correct image for your board model (Banana Pi vs Banana Pro).
Board boots but no network access
- Symptoms: HDMI/serial shows login prompt, but no IP address appears in router DHCP list or
ip ashows no address on eth0. - Likely causes: Ethernet cable fault; DHCP not enabled; network interface not brought up by image.
- Steps:
- Check for link LEDs on the Ethernet port (both board and switch/router). Try a different cable and port.
- Log in via serial or local console (HDMI + keyboard) and run
ip a. If eth0 shows "state DOWN", bring it up:sudo ip link set eth0 up. - Check for DHCP client:
ip rshould show a default route. If not, runsudo dhclient eth0manually. - Confirm DNS resolution:
cat /etc/resolv.confshould show nameserver entries. Test withping -c 3 8.8.8.8. - Reboot and check
dmesg | grep ethfor driver errors. Some images require manual network configuration.
Filesystem read-only or shows corruption
- Symptoms: Cannot write files;
dmesgshows I/O errors; filesystem remounted read-only. - Likely causes: Poor-quality SD card; insufficient power causing storage errors; interrupted write during flash.
- Steps:
- Replace the SD card with a known-good, high-endurance card (SanDisk Extreme, Samsung EVO, Kingston Industrial).
- Re-flash the image after verifying the checksum. Use Etcher or RPi Imager to avoid manual errors.
- Ensure power supply is stable (5V 2A minimum). Measure voltage at the board if possible; it should not drop below 4.75V under load.
- Run a filesystem check from another Linux system:
sudo fsck.ext4 -f /dev/sdX2(adjust partition number).
Locked out of SSH after disabling passwords
- Symptoms: SSH connection refused or "Permission denied (publickey)."
- Likely causes: SSH key not deployed correctly; typo in sshd_config; SSH service not reloaded.
- Steps:
- Connect via serial console or HDMI + keyboard to regain access.
- Check SSH key is present:
cat ~/.ssh/authorized_keysshould show your public key. - Verify sshd_config:
sudo grep PasswordAuthentication /etc/ssh/sshd_config. If set incorrectly, edit and set toyestemporarily. - Reload SSH:
sudo systemctl restart sshorsudo systemctl restart sshd. - Test key-based login from your workstation before disabling passwords again.
Common mistakes
- Flashing the wrong device (double-check
lsblkoutput) - Powering from an undersized supply or a weak USB port
- Assuming a flaky SD card is a software problem
- Disabling password SSH logins before verifying key access
FAQ
Do I need a serial console for first boot?
Not for typical installs. If you have Ethernet and can check your router's DHCP list, you can SSH directly. Serial consoles (3.3V USB-to-TTL adapters) are most useful for debugging bootloader issues, early kernel panics, or when network access is unavailable.
Can I run the board headless (no display)?
Yes. Connect Ethernet, power on, wait 60-90 seconds for DHCP, then SSH using the IP from your router. This is the simplest baseline for server or embedded use cases.
Should I use WiFi on first boot?
Ethernet is strongly recommended for first boot. It removes variables (WiFi driver loading, credentials, signal strength). Configure WiFi after the base system is stable and you have verified Ethernet access.
How do I know if the image is for my board?
Check the image filename and description on the downloads page. Banana Pi and Banana Pro use different configurations (especially for WiFi/Bluetooth on Banana Pro). Using the wrong image will cause missing devices or boot failures.
Why does the board reset randomly?
Random resets during boot or operation almost always indicate undervoltage (weak power supply, thin/long cable) or a failing SD card. Start by swapping the power supply and cable, then try a new SD card.
Can I resize the root filesystem after flashing?
Many images auto-expand the root partition on first boot. Check with df -h / after booting. If not expanded, use raspi-config (if available) or manually resize with parted and resize2fs. Always back up before resizing.
How often should I update the system?
For servers or production devices, schedule updates monthly during a maintenance window. Test updates on a non-critical board first. For development boards, update weekly to stay current with security patches.
What if I lose access after an update?
Use a serial console or local HDMI + keyboard to regain access. Check journalctl -b -p err for errors. If SSH is broken, verify the sshd service is running: sudo systemctl status ssh. Revert the last change if necessary.
Do I need to install additional drivers?
Most drivers for onboard hardware (Ethernet, GPIO, HDMI) are included in the kernel provided with the image. For external USB devices (WiFi adapters, Bluetooth dongles), check dmesg after plugging in to see if the driver loaded automatically. Install firmware packages if needed: sudo apt install firmware-linux.
Can I use a USB keyboard and mouse on first boot?
Yes, if using HDMI for local console access. However, high-current USB devices (external drives, powered peripherals) should be avoided until you confirm the board boots reliably with minimal load. Use a powered USB hub if you need multiple devices.
Related guides
Author: LeMaker Documentation Team
Last updated: 2026-01-11